 The second thing that I finished FINALLY was staining and varnishing the steps. The very top step had never been finished (remember I made the steps just one more step higher at the last minute). With that step finished all I needed to do was sand, stain and varnish. They look so nice. Makes me feel like they are now inviting you to look upstairs. Hmmmm... what do we have up there? That's for another post.
Wednesday, November 24, 2010
Curved Steps
The second thing that I finished FINALLY was staining and varnishing the steps. The very top step had never been finished (remember I made the steps just one more step higher at the last minute). With that step finished all I needed to do was sand, stain and varnish. They look so nice. Makes me feel like they are now inviting you to look upstairs. Hmmmm... what do we have up there? That's for another post.
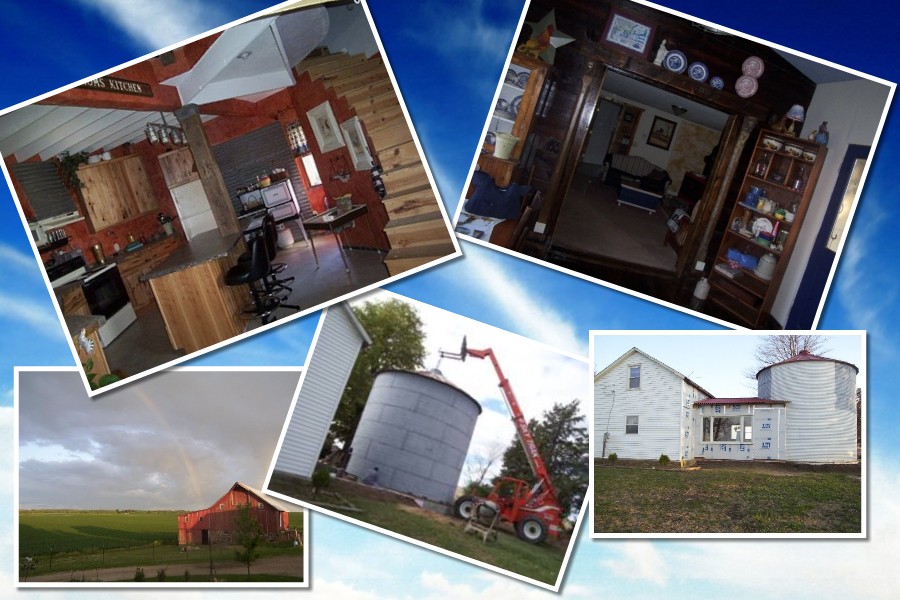
A look around the farm
 It's going to snow soon so I just wanted to share some pictures that I've taken this year. This is my maple tree that when it was little I twisted the branches together. I'm told the tree might die because I did this, but so far so good.
Here is a picture of my "whites" I love percale sheets and my white dish towels have all of the months on them. I of course hang them up in order.

This is my grape arbor. I planted them the first year we moved here and it took about 4 years to get grapes. The metal frame is from a gazebo that blew away and as usual, I recycled it.
And of course, they are the reason I love to make our farm a cool place to visit.
Where did the laundry go????
With the new sidewalk finished and I was getting itchy to do something new. I've completed two jobs since the sidewalk. First the bathroom laundry closet. Ever since I've lived here the washer, dryer and furnace was out in the open in my bathroom. I hated it! When company came over they got to see all the laundry. Not that everyone doesn't have dirty clothes, it's just that I don't want them to see MY dirty clothes. The idea was to continue to use the wainscot. Off to Menards to buy car siding. It looks like wainscot and it's about 3/4 inch thick. I cleared my foyer floor and set to putting the doors together. Car siding is tongue and grove so it should have just popped together. It did not! The boards looked nice at the lumber company but when we got them home and put them together they were not exactly what I would call straight. Grrr... None the less, they were screwed together and glued. The glides were hung across the top and wa-la. Doors which now cover up the laundry and furnace. The sign says, "Grandkids Welcome,Parents by Appointment.

They also look nice from the living room. I should have done it years ago. My bathroom now looks and feels so much better.


They also look nice from the living room. I should have done it years ago. My bathroom now looks and feels so much better.

Wednesday, October 13, 2010
How to make everyone happy! Concrete!
 This is my dad. My mom died several yea
 rs ago and he's been hiding out in the house ever since.
Today.... I belive was his happiest day since the day she died and I am pleased I got to share
this happy day with him.
:-) :-) :-) :-) :-) :-) :-)
 The first picture is of the forms. To make the forms we used what my dad called "masonite". Well... actually it's what Menards called masonite. My dad wasn't so happy with it because it's not what he used years ago. I can't say I was very happy with it. Although the forms only sat for 3 days, every morning they seemed to "grow" just a little. Which gave us just a few more little curves to contend with. Grrr......
The morning we poured, 

we set re-bar in the bottom and wired it together.
 When the truck got to our house dad wasn't very happy
 with the consistancy of the concrete and he had the driver add almost 7 gallons of water.
We ordered 3 yards, 6 bag mix, 6 inch slump.
 The center of the patio was wet screeded.
 The center of the patio was wet screeded.
 (Not sure that's the right word, but that's what he called it.)
There was no guide in the middle of the patio so with his eyes,
he pulled the concrete to the proper level.


Then we waited. Dad makes this process look easy,
that's because he spent 53 years doin' concrete!

When the perfect moment came,
we edged the sidewalk and put the joints in it.
We also, "wiped it out" or as he calles it, "magged it".

 The next thing was to broom it.

 The next thing was to broom it.
 Brooming causes little marks in the sidewalk. Traction!

Nice curves!

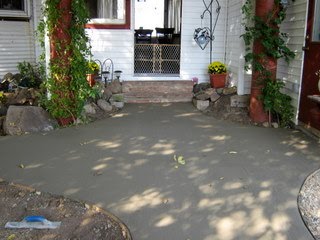

This is the day the Lord has blessed!
Tuesday, August 10, 2010


The Plant Room
My granddaughter who is almost 3, has learned to plant and water in this room. She loves tomatoes and when the first red tomato appeared she could hardly contain herself until she could eat it. "All by myself." Every morning, we test the soil in "Lulu's flowers". She has a little plastic cup she uses as she tests each plant and decides if it need "a bunch" or "only a itty bit". To decorate this room we traveled around to all of the Goodwill stores and told all of our friends we were collecting terracotta pots and copper containers. It's amazing just how many copper "things" your friends have if you just ask them! I am hoping that we can keep the garden vegetables growing in our plant room well past the normal growing season. I'll let you know how that turns out.

Wednesday, March 3, 2010
Good bye concrete


Well folks, I've covered up the concrete floor. I tried. I really had a vision of stained concrete for my kitchen but it did not work out as well as I had wished. Everytime I cleaned my kichen the floor still looked dirty and who wants to eat in a dirty kitchen? The bin floor space about 254 square feet. Subtracting the area the cupboards sit on and the steps cover it turns out to be about 185 square feet. Because the bin is round and the island is set in the room at an angle, I decided to off set each tile. There was LOTS of cutting to fit around all the curves, island and cupboards. It took about a week to finish. I laid the tile on one side of the counter on the first day, let it sit overnight and grouted it the second day. The next two days I did the same on the other sides of the island. The grout lines have been sealed, which took a full day with a little bitty paint brush! The next step for the kitchen is to grout the slate around the door. I've used slate as trim. It looks pretty cool. Keep watching for pictures.
Subscribe to:
Posts (Atom)

